Restoration of a General
Electric CA Monitor Top Refrigerator - Part 5.
< Go to Part 4.
13.1 Installing the cooling unit.
It quickly became apparent that it was impossible to lift the cooling
unit onto the cabinet by hand. Apart from the weight, the cabinet is 1300mm
tall and the bottom of the evaporator has to be lifted over the top. Then
the cooling unit has to be delicately aligned so that the seal and high
side tube is not caught as the unit is lowered.
GE did make a portable hoist specifically for Monitor Top installation
but as this was only used by installers, such an item would be impossible
to obtain now.
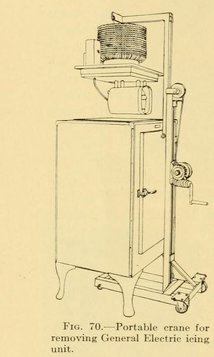
For those that want to attempt copying it, this is the GE crane
for the cooling units.
.
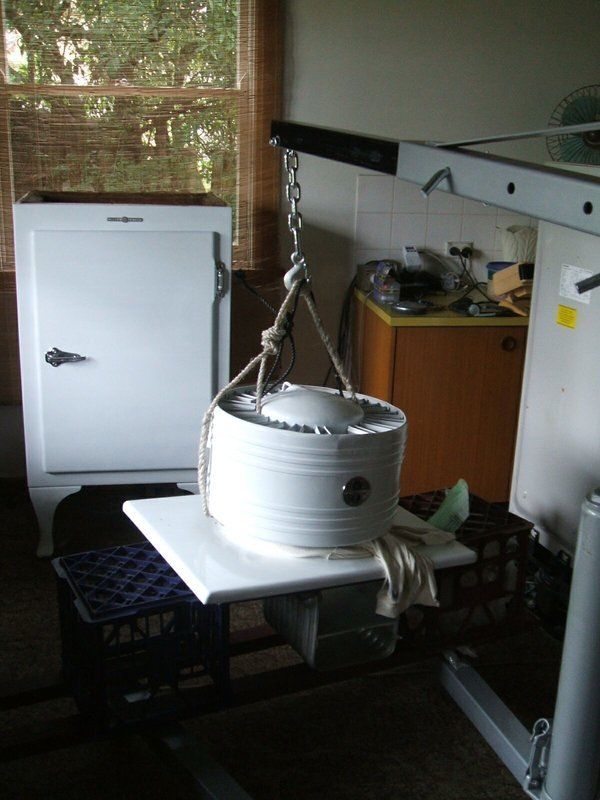
An engine hoist is an ideal substitute and is what I used. It is
important that the hoist can be raised at least 2m.
The cooling unit was supported on milk crates which in turn were placed
on the feet of the hoist. Once the hoist was raised, the crates were removed
so the hoist could be pushed in front of the cabinet.
Lowering the top into the cabinet is a tricky procedure and requires
a lot of care. As the high side tube runs right against the cabinet opening,
it is easily damaged. The seal is easily caught on the cooling unit as
it is lowered, so this must be done slowly checking frequently that everything
is in the right position.
As my cabinet was slightly out of square, the top had to be lowered
with the back lip on first and then the cabinet pushed into square as the
front was lowered. Once on, the top lip keeps it square.
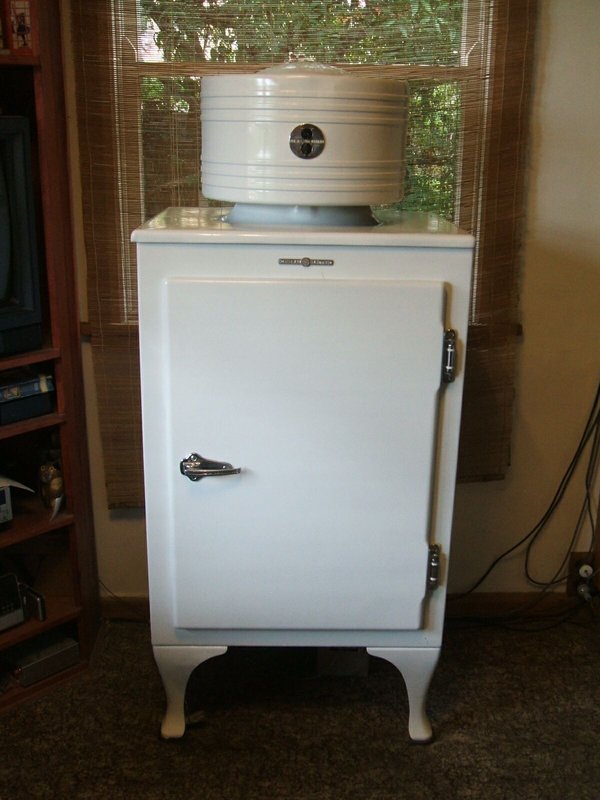
The restored CA-2-B15.
14.1 First operation in cabinet.
As always when the cooling unit has not been powered, it is necessary
to run the heater first, to evaporate the Methyl Formate from the oil.
It does not take long for the Methyl Formate to start boiling once the
power applied. This is audible by listening close to the compressor. The
boiling gradually gets louder, and after a few hours it stops. This means
it is ready to be used.
It was found that ice cubes could be frozen in a plastic tray sitting
in the evaporator, so it would appear the temperature was low enough.
14.2 Calibrating the thermostat.
Despite the cabinet temperature appearing to be sufficiently low, the
compressor rarely switched off, even on the No.1 setting. Looking through
the AK service manual (Canadian version of the CK), it appeared that the
thermostat knob might need to be reindexed. The fact that I had removed
the bellows from the rear of the thermostat could have upset calibration.
Also mentioned was the effect of atmospheric pressure on the bellows, and
that at higher altitude the calibration would be different. This was plausible
given the elevation at my location.
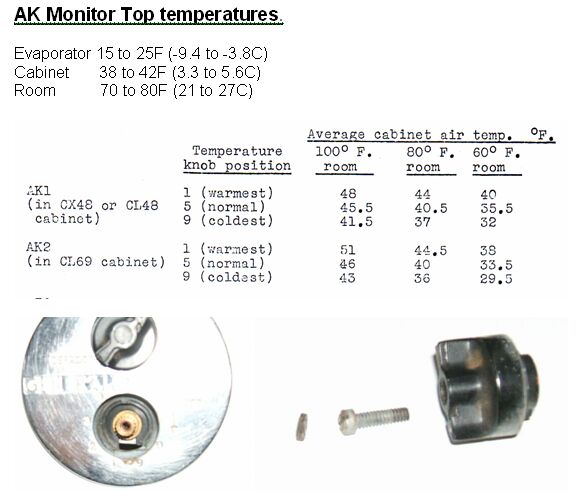
My assumption was that given the evaporator temperature should be no
more than 25 degrees F, then that should correspond with the warmest setting;
i.e. 1.
Removing the knob requires the centre disc to be carefully prised out.
I used the smallest size jeweller’s screwdriver I had. With the knob initially
set to 1, I took it off and moved it to 6. Effectively, it had 6 positions
more in the warmer direction. This seemed a good guess with the evaporator
settling at around 25 degrees F. Cycling of the compressor was improved,
but not optimum. This I assumed would be losses through the door seal.
15.1 Door seal.
I was able to purchase a reproduction seal from Don at Rusty Metal
Rescue.
This has to be contact glued into position as it does not have the
barbs that fit the holes around the door edge.
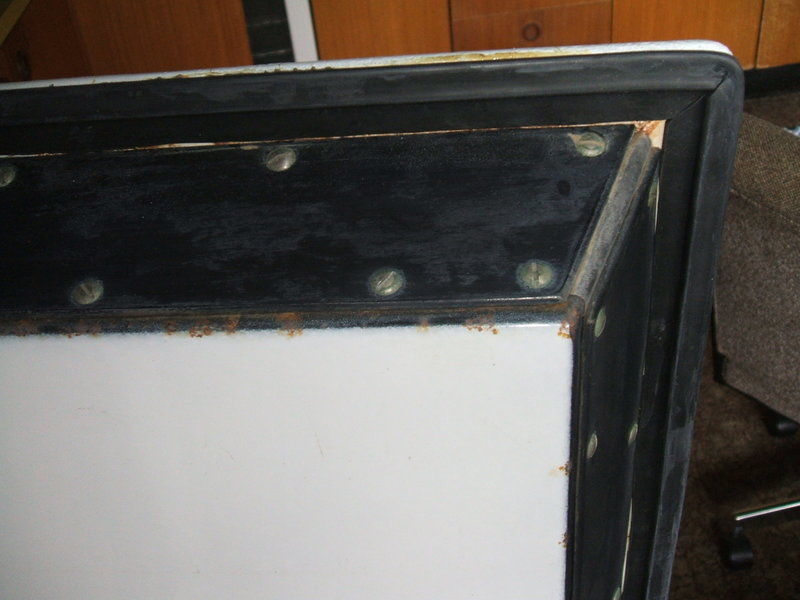
Unfortunately, upon reinstalling the door, I found the bottom left corner
still had a gap. Further investigation revealed the cabinet was slightly
warped in this area. It appears from the dent in the foot below this area
that the cabinet has been dragged with all the force on this leg, thus
applying stress to the bottom of the cabinet immediately above. Given the
impracticality of getting the cabinet perfectly square, I simply added
a thin piece of neoprene seal to fill the gap.
Reproduction foot pads were purchased to replace the originals.
16.1 Non condensable gases again.
Over the course of running the fridge, it had been noticed that after
a few hours performance would drop off, with a low frost line and continuous
running, along with warm cabinet temperature.
Yet, if the fridge was rested for a few days all would be reasonable
again for another few hours.
I had developed a theory that maybe non condensable gases were present
in the compressor walls and the motor and being driven out when warmed
up.
Given that the motor windings would still be likely to contain moisture
(the motor was not heated during evacuation) this seemed a likely scenario.
So, I purged the non condensables again; it took a couple of hours
before the methyl formate appeared.
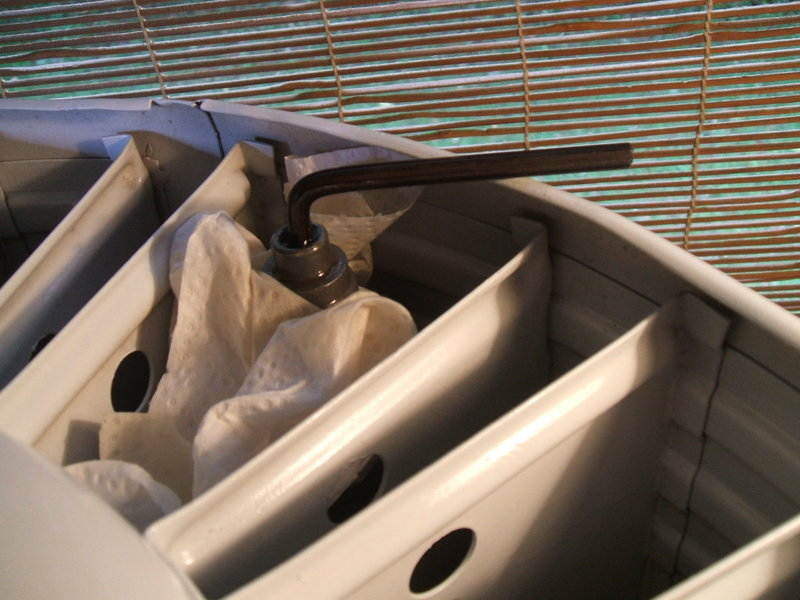
Purging the non condensables requires oil to be placed in the charge
valve to ascertain positive or negative pressure.
Performance was now excellent. Within a few hours the duty cycle was
perfect; 2-3 mins on and 10-13 mins off. On the No. 9 setting the evaporator
got down to 3 degrees F which was more than sufficient, especially as the
bottom of the cabinet was below freezing.
With this excellent performance still at 11pm, I decided to leave it
on over night. Alas, next morning was a disappointment with the compressor
running continuously, a low frost line, and ice melting off the evaporator.
My theory at this point was that not all the moisture had been driven
out of the motor during the previous purge. Thus it would seem necessary
to repeat purging until it is.
16.2 Float valve blockages.
A further purge was required, but performance was still poor. As non
condensable gases were not the problem, it had to be a blockage. Tapping
on the side of the float chamber’s needle and seat area brought forth a
good flow. Several times the fridge had been run with a gradual decrease
in performance after a day. A pattern was emerging, in that if the fridge
had been rested for a day or more, it would run perfectly but always start
to deteriorate after a day’s running. By this time, power consumption was
under 200W (including transformer and oil heater), and the frost line would
be very low.
With non condensables eliminated as the problem, another theory was
looking plausible. Observing power consumption over the time the fridge
ran correctly showed an initial draw of about 240W. As the fridge cooled
and was cycling normally, consumption went down to about 200-210W.
It would appear that the density of methyl formate decreased as it cooled
because of less strain on the compressor, which in turn relates to less
power consumption. So, with less pressure, there is greater difficulty
in clearing the blockages. This would explain why the blockages largely
cleared themselves on initial power up, but not so after the fridge was
down to normal working temperature.
Running the fridge for 10 days continuously showed up an interesting
pattern. Blockages would usually occur at around 5am which is the coldest
part of the day inside the house. Late at night, the power consumption
would start to drop and the cycle time reduce. With the float seat starting
to block, a higher than normal vacuum would occur in the evaporator which
in turn means the compressor has less vapour to suck in. Thus, the compressor
runs at less of a load. When this happens, the power consumption drops
to about 185-190W. After this, the frost level falls because the
incoming liquid is not being replenished as fast as it is being evaporated.
Short cycling then starts to occur. This is presumably because with less
frost on the evaporator, it is less able to store the cold temperature.
Eventually, the frost line drops so that it is no longer near the thermostat
bulb, and the compressor runs continuously.
16.3. Compressor timer.
Not always being at home meant that in the event of the compressor
running continuously, I would not be able to turn it off and/or clear the
blockage. So, I built up a timing circuit that sensed when the compressor
was running. If the compressor ran for more than 25 minutes (or any other
desired time), power would shut off and remain so until manually reset.
This would protect the motor from an excessive run time. Importantly, it
meant I could leave the fridge running unattended and not worry about it.
Operation is sensed by a current transformer. This actuates an Omron H3CR
timer set for 25 minutes.
If the timer is not reset within that time, a relay latches cutting
power to the fridge.The relay remains latched while ever the 120V supply
is present.
16.4 Improvement in operation.
Running the fridge for several months did improve things considerably.
The blockages became much less frequent. In fact, instead of hours apart,
it was now days. It would appear that whatever was causing the valve to
stick may have been gradually dissolved. Alternatively, the constant flow
of methyl formate and valve operation may have “machined” the needle and
seat for a less sticky fit. There is no difficulty in freezing ice in plastic
trays and the cycling times are good; 2-3 minutes on and at least 10 minutes
off. Correct temperature is with the control in position “3”. This suggests
the calibration is satisfactory, although for correctness the knob should
be moved to “5” before screwing back in.
17. Shelves.
Only two of the three shelves were present. They are made of steel
and either galvanised or zinc plated. The finish is too dull to be nickel
or chrome. A previous owner has painted over this with white enamel.

The shelves had been painted in white enamel over the original plating.
The black objects on the lower shelf are the original foot pads.
I had the shelves replated by Artarmon Electroplating. It appears that
they were originally zinc plated and this is what was recommended. Nickel
or chrome was advised against due to rusting in the moist environment.
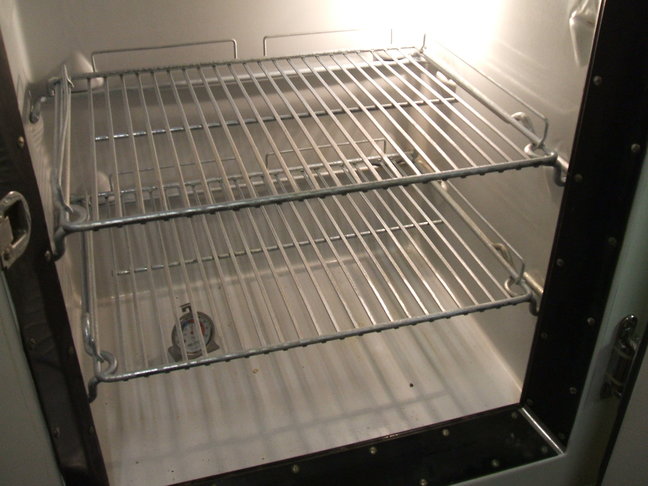
Like new again, the shelves were the final part of the restoration.
18. Acknowledgements.
This was my first entry into the world of refrigeration and would have
found it considerably more difficult without the help of others. There
is a lot of negativity about working on Monitor Tops around the internet,
and when I found the Flickr group all that changed. In particular, due
acknowledgements must be given to the following group members for their
help:
-
jhigdon2 - the guru of monitor top repair.
-
worldsfair39, Coldspaces61, and Allan 1955 - enthusiastic members always
keen to see how the restoration was progressing.
-
and of course, litlnemo - for establishing the group in the first place.
In the Yahoo group, particular thanks are due to plaza4044 for posting
the Nickerson & Collins info on the CA units.
And finally, fellow HRSA member, Owen, who helped me understand the
fundamentals of refrigeration.
19. Suppliers.
Links
Monitor
Top Refrigerator Forum (replacement for Yahoo and Flickr Groups).
Yahoo
group - GE Monitor Top Fridges. (no longer active due to Yahoo changes).
Flickr
group - Monitor Top Refrigerators.
Postscript - Capillary Conversion.
Unfortunately, the reliability of the float valve in this machine turned
out to be very problematic. It would block up frequently. After the success
of the CA-1, the obvious solution was to do a capillary conversion.
See the details here.
This improved reliability considerably, but evidently the system had
been badly contaminated because NCG build up was still frequent, requiring
purging every month. The decision was made to confirm this was not due
to leakage, so the unit was evacuated and filled with 50psi of R22. A leak
detector could not find any evidence of leakage. Much to my surprise, the
R22 must have had some kind of cleaning effect, because after evacuation
of the R22 and refilling with methyl formate again, performance was really
good. No purging was required for seven months. Cycling times were good;
4.5 mins run and up to 16 mins off with a cabinet temperature of about
34F.
The initial capillary conversion had to be redone because the length
of the tube was too short for efficient use with the compressor running
on 50 cycles. After much work, the optimum length of tube was determined.
Experiments were then done with the thermostat, April 2014, to see if
the the temperature differential could be adjusted.
In January 2015, a year after doing the capillary tube conversion, a
high side blockage occurred. The inline strainer was completely clean which
was good news - no more corrosion evident. However, it indicated the problem
of the blocked evaporator remained. Again, I am led to believe this cooling
unit has been left open to the atmosphere for quite a long time. Once the
evaporator was replaced, no further troubles were experienced.
The following is from postings on the forum giving details on the work
done:
See
forum post here for the following:
Thermostat Experiments.
13 April 2014:
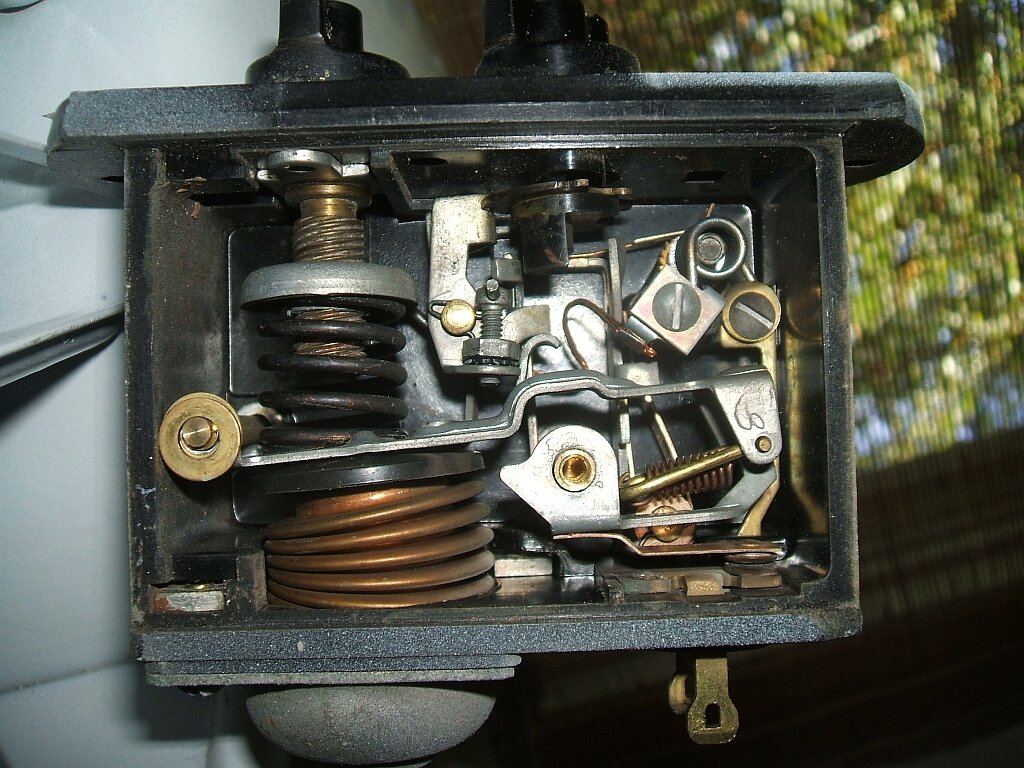
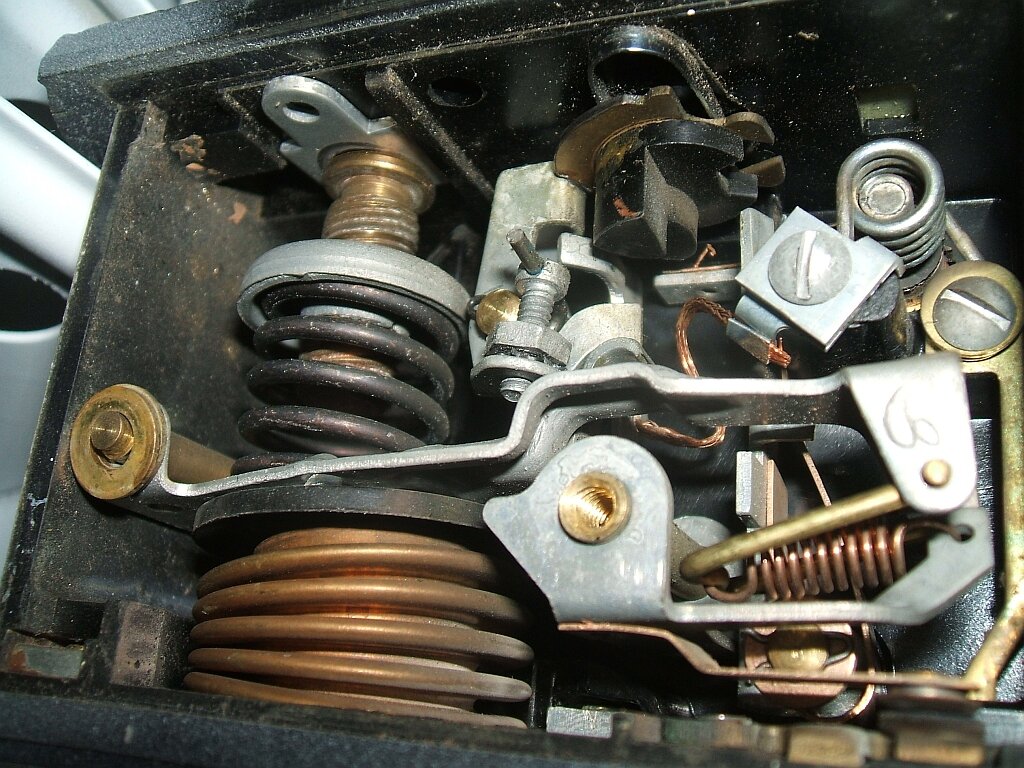
The purpose of extracting the control is
to adjust the temperature differential. The problem is the difference between
on and off temperatures was 7.2F. It should be 9F. The reason why it needs
to be increased is to lessen the frequency of cycling.
To measure the temperature, I've frozen
a temperature probe to the bottom centre of the evaporator (as per the
manual). I find the IR thermometer not sufficiently accurate for this kind
of measurement, as it only has to be moved a few mm to give a different
result.
As we all know, GE doesn't want anyone
working on the inside of the 1933 and later controls. So, nothing is said
in the manual about internal adjustment.
However, we do know the defrost facility
is tied in with the temperature differential, which is increased considerably
when the knob is turned to defrost. The cut in temperature is raised to
above freezing point, while the cut out temp remains the same. Thus during
the off cycles, the frost will thaw.
Luckily, in the DR manual it does talk
about adjusting the cut in temperature. While they're quite different controls,
the temperature differential setting appears to follow the same principles.
For the CA form B control, it is interesting
to note that there's an adjustable nut associated with the defrost cam's
lever. Yet, in the Scotch Yoke manual, the similar looking two knob control
does not appear to have this adjustment.
My initial experiment was simply to bend
the arm a little. Bad thing to do because it threw everything way out of
calibration. Fortunately, I had marked a line at the end of the arm so
by placing a steel rule against it, I could see how much I'd bent it. So,
I bent it back, and am now experimenting with the nut.
The process is one of those things like
the cap tube and charge experiments, of having to put everything back together
and waiting for it all to stabilise, before meaningful results are obtained.
A worrying thing is how many times I can bend the tube before it breaks
- it has to be straightened out each time the control is withdrawn, and
then bent back to clamp it to the evaporator. I'd really like some means
of calibrating the control outside of the fridge.
14th April 2014: Turning the nut
1/4 turn clockwise has given an extra 3 mins off time. That's with less
than 1 degree C extra differential. I can't see exactly what as my digital
multimeter/thermistor set up only reads to whole digits.
This morning, the on time was 3 mins 16
sec and off time 14 mins 39 sec. Cabinet temp 37F. Quite acceptable, but
as I want it the same as what the manual says, I still need one more degree
C difference. So, I'll try another half or 3/4 turn.
I like the idea of using a chest freezer
to calibrate the control, but alas I don't have one.
15th April 2014: I need to make
a correction here. Closer examination has revealed the adjusting nut only
sets the temperature differential for the defrost. Contrary to what I said
previously, it has no effect on the ordinary running differential. This
it seems is best set by bending the curved arm attached to the defrost
linkage.
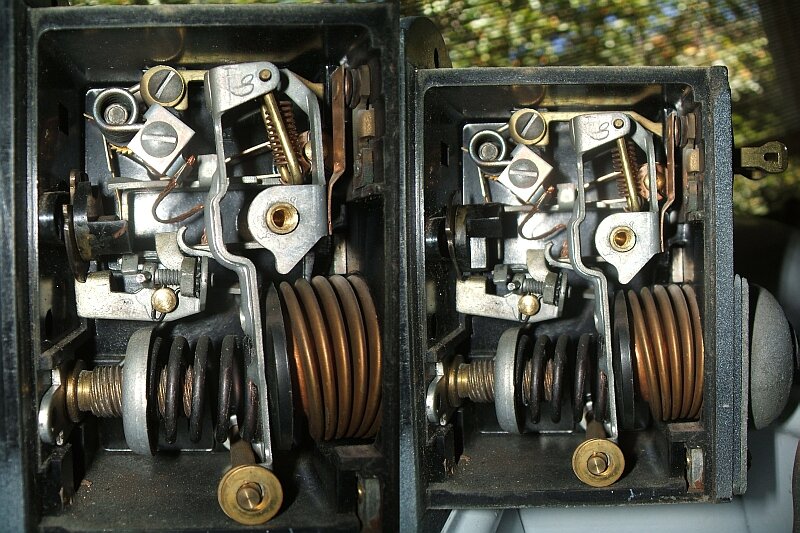
To try and give a clearer illustration,
the pic on the left is with the knob in "on". On the right, it's in "defrost".
When in "on", the main arm that actuates the contacts has a hook shaped
protrusion that rests against the curved part of the defrost arm. The defrost
arm bears against the cam at the back of the knob.
When "defrost" is selected, the cam at
the back of the knob releases the defrost arm, which now under spring pressure
it now pushes against the main arm. The degree of this spring pressure
is set by the nut. You can see the end of the spring going through the
head of the screw to which the nut is attached.
One could assume if the cam wears that
the temperature differential would change.
Obviously, the increase in differential
that I got was caused simply by not bending the main arm back exactly to
where it was in the first place. What I should have done is to bend the
hook shaped protrusion of the main arm, which I've now done. Of course,
I've restored the nut to the original position.
As for bending the bellows tube each time
the control is extracted, I'm trying to bend it gradually and different
points to try and spread the stress.
15th April 2014: How strange. Putting
the nut back where it was gives the old cycle times; 2.5 mins on 11 mins
off. I'll need to have a closer look at the cam - maybe the nut works on
both defrost and normal running. I have to say, it does seem strange the
nut would adjust the defrost and not the normal running...the defrost would
be far less critical, as long as the off temp is something above freezing,
doesn't really matter what.
So tantalisingly close to having it working
perfectly....and yet I have to fully understand the control first to do
so.
Cleaning out and leak testing with
R22.
See
forum post here for the following:
21st April 2014: This procedure
of having to purge it every month is obviously indicative of a real problem.
This time round it didn't fix it. Not sure if I went to excess because
now the frost line is much less, so much so the thermostat sensor is no
longer frosting to switch off. On a positive note, I can confirm the capillary
works perfectly - evap down to -6F at least before I manually turned it
off. Quite interesting to watch the film of ice at the bottom shatter like
a pane of glass as it got colder and colder.
It's time to prove if there's a leak or
not. I've got a cylinder of R22 at work and a leakage detector I'll use.
First I'll recover all the methyl formate
and then vacuum it. Putting in some R22 and nitrogen to pressurise to about
80psi ought to show any leak.
If there's no leak then something must
be reacting with the methyl formate. In which case I need to try and get
some R601a which won't react with anything and produce NCG's or acid.
Something really bad must have happened
to that fridge, because in comparison the CA-1 has been airtight since
July last year, been running for the last 6 months and never needed a purge.
22nd April 2014: The method
I use is to slowly bubble the gas out until the float chamber has warmed.
I've always done it like the training film says - bubble it as fast as
possible without blowing the oil out. Perhaps my interpretation of "fast"
needs to be a little less enthusiastic! Soon after, the methyl formate
makes its appearance by visibly boiling in the oil when the valve is closed,
and it soaks into the paper towel a lot faster than the oil. And, I can
feel it evaporate off my fingers when I touch the paper towel. I have difficulty
detecting it by smell unless it's really concentrated.
During the capillary tube experiments,
it would take about 45 mins to purge the nitrogen out, but when I installed
the last cap tube, it didn't seem to need as much purging. Hence, my decision
to purge it longer this time, as I thought there might still be nitrogen
inside.
One thing I have noticed is when I used
to use sewing machine oil that the methyl formate droplets would react
with it making it quite visible, but the refrigeration oil I've used of
late doesn't do that. I think I might go back to the sewing machine oil.
The fact it has required this constant
purging, about once a month when it's running, has to indicate a leak.
I was quite annoyed by this last episode because I wasn't able to finish
off my thermostat experiments.
It's easy to be trapped by this CA-2's
charm, because after a purge it always works really well. After a few days
one starts to think nothing could possibly go wrong. And then in a few
weeks it happens again - the frost area contracts a little. The float chamber
starts running cool under load. And then the bottom half of the condenser
starts to run cool - you know you're not imagining it when that happens.
22nd April 2014: 22 Apr 2014 at
09:59 allan said:
"I gotta believe you are still purging
out that nitrogen you put in on the last repair. The nitrogen probably
behaves differently than the MF byproduct NCG. While it is a NCG to that
system it is probably more difficult to separate and takes more time."
Good point and it's actually what I was
thinking when I started the last purge. It could well be that having nitrogen
in the system might be different to MF NCG's or air.
It is interesting to observe the operation
when commencing the purge after working on it. Even with all the nitrogen
inside, it does frost the evaporator. I find this interesting as the condenser
does not appear to be doing anything. As purging continues, it all melts,
and then frosts again as the condenser starts warming.
I suspect that the dome is actually working
as a form of condenser to start with, because for a brief period about
halfway through the nitrogen purge, the compressor rattles. This would
suggest excess liquid in the compressor base. As the condenser continues
to warm up it then goes quiet as the liquid now condenses there. This sequence
of events occurs every time I purge the nitrogen after working on it.
The thing that does have me suspicious
is that previous to the cap tube, it still needed purging every month with
the float valve. Amazing how the time has gone, but I first had that machine
operating December 2012. I ran it all of 2013 with the float valve and
the purging frequency was much the same throughout the year; every 4 to
6 weeks that I actually was using it. You'd think that after all that time,
the NCG's would have been bled out, even if I was using the wrong procedure.
Something must have continued to produce them.
I really need to do the leak test just
to confirm one way or the other for peace of mind.
If a leak cannot be detected, then it
will narrow it down to methyl formate breakdown for whatever reason, or
incorrect purging.
22nd April 2014: 22 Apr 2014 at
13:25 allan said:
"Could be a micro leak. Either the service
valve or maybe the vapor line braze joint to the evap. I guess leak could
be anywhere but check those two areas very closely. It doesn't take much
r22 so use it pure with no nitrogen after a good vacuum for the best success
with the leak detector. A vacuum leak is very strange,"
I have a suspicion it's going to be found
on the low side. My reasoning is that the NCG build up seemed to only occur
when the machine was in use. For example, if I purged it and then left
it switched off for a month, I wouldn't need to purge it when starting
up again.
There were two leaks on the evaporator
when I first worked on it, but as the evaporator held pressure for a month
after soldering them up, I assumed all was well.
At the time, I only used detergent bubbles
to test - which I understand isn't so reliable for micro leaks.
For pure R22 only, how much should go
in?
20th May 2014: The leak testing
is now under way. For the last couple of days, the unit has been pressurised
to 50psi with R22. It took just over 200g of R22 to get this pressure.
No leaks are detectable yet, even around the charge valve. I know the leak
detector works because it did find the leakage from the valve adaptor.
See
forum post here for the following:
31st May 2014: After several weeks
of being pressurised with R22, I'm inclined to think my CA-2 does not have
any leaks. So, the only option was to start all over again and see what
happens. I rinsed it twice with nitrogen. Interestingly, there was quite
a lot of vapour coming out of the vacuum pump. Clouds of white vapour which
I'd never seen before either when evacuating the CA-1, or the CA-2 first
time round. I hadn't anticipated this so whatever it was settled on the
kitchen table but I didn't see any residue. Just maybe after a year of
running, the contaminants had been freed up and were now being removed.
Incidentally, I got a slightly better
vacuum now using the O ring instead of the copper or lead washers with
the charge valve adaptor. Over 29.9".
I put in 2.22 lbs of methyl formate (80.7%
charge) as a starting point and ran the fridge overnight. I also added
half a funnel of 4GS oil. From here things got interesting. I was surprised
to find the cabinet at 32F this morning - it didn't used to get quite that
cold at #5. Surprisingly, for that cabinet temperature, the cycling times
are also very good - keeping in mind I hadn't finished optimising the control
temp differential. About 4 min 30 sec run and 16 mins off! 16 mins off
with 32F cabinet temp really surprised me. Never has this fridge been able
to do that before. Any doubts about cap tube performance on 50 cycles are
now settled.
As for the charge level, it could do with
a little bit more just to get the frost to the ends of the evaporator,
but tank level looks good.
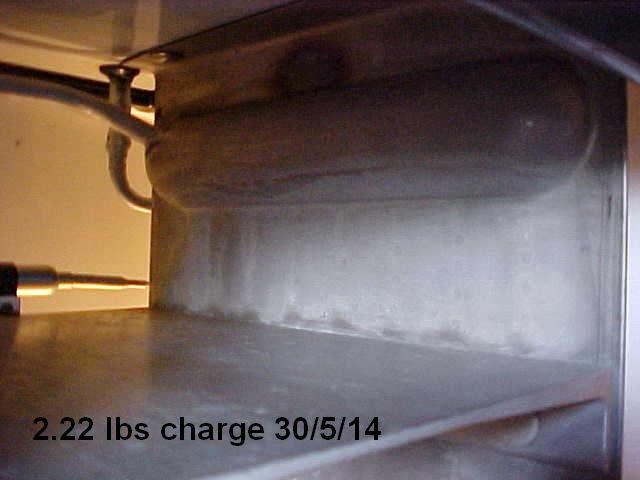
2nd June 2014: It's been running
since Friday afternoon with no deterioration in performance. The compressor
is drawing a little less power than it used to (about 10-15W less), the
off times are longer, and if I'm not mistaken it runs slightly quieter
too (the extra oil?) - not that it was ever noisy. At this point
I don't see the need to adjust the charge level, but how high it is with
only 80.7% charge surprised me somewhat.
6th June 2014: I've made the video
so you can hear how it sounds www.youtube.com/watch?v=7QhsGV9DKTA&feature=youtu.be
The link is also in the Reference Section.
Seeing as it's performing so well after
being cleaned out, I treated it to a new toroidal transformer. What a difference
that made to power consumption. Now, compressor running is 160-170W instead
of 200-210W, and when not running it's 14W instead of 30W. The previous
E-I laminated transformer was terribly inefficient.
Blockages again.
See
forum post here for the following:
18th November 2014: It's been nearly
6 months since I've said anything about my CA-2. Since optimising the cap
tube length, adjusting the thermostat differential, and cleaning out the
system with R22, it had been working perfectly. Seeing it's performance
was so consistent and reliable, a bit over a month ago I started using
it as my main fridge and even with the warmer weather and a few hot days
I couldn't have been happier with its performance. When it's working, this
fridge has a certain charm about it - one that entraps you into thinking
nothing could ever go wrong with it again. I hadn't said anything here
about how well it was working in case I jinxed it.
Well, I needn't have bothered, because
in the last couple of days I sensed something wasn't right. Some of the
run cycles seemed to be a lot longer than they should be, despite the hot
weather. Then, two nights ago I was looking at the power meter and saw
it fluctuating from 178 to 151W and I could detect a change in compressor
sound while it was doing this. Normally, the consumption is steady with
a gradual decrease towards the end of the run cycle. I had never seen it
get below 161W.
It seemed to come good again, and then
lulled into a false sense of security it did it again last night. Now the
power consumption was staying low, and getting down to 138W, and the evaporator
started thawing.
I moved all the food into the ever faithful
and reliable CA-1.
As to the problem, I believe it's blocked
up on the high side again. Back in its float valve days this is exactly
what it would do. The float seat would clog up and the the low side goes
into a deep vacuum. With nothing to suck and compress the current drops
markedly. It would more often than not do this in the evening as the room
temperature cooled, and presumably the methyl formate pressure dropped
to the point it couldn't force itself past the blockage.
Of course now the float valve is long
gone, the likely place for blockage is going to be the inlet of the filter,
and presumably it will be the same copper sulphate crystals. Perhaps some
has got through and is clogging the cap tube.
So what to do? First to take off the filter
and cap tube and confirm either or both are blocked. Depending how bad
the blockage is, I might just replace the filter and try again. It has
after all taken nearly six months for this to happen. Unfortunately, the
system has to forever live with the crap circulating through it, because
short of cutting open the compressor and evaporator and cleaning it all
out, there's nothing I can do to get it all out. At the moment I'm thinking
about a larger filter so there's more room for the crap to collect, then
have that feed the existing small filter and cap tube. A sort of dual stage
arrangement.
That takes care of what I'll be doing this
weekend. Yet again set up the engine hoist and turn the kitchen floor into
a refrigeration workshop.
If I could simply replace the top with
one that hasn't been open to the atmosphere I would, but that's not going
to happen in this part of the world.
18th November 2014: First thoughts
(hopes?) were it would just be an oil plug but I defrosted and heated the
evap and still no go. In its moments of coming good the only indication
was the power consumption going back up to normal. There was never the
sound of an oil plug breaking free. I will try again before I open it up.
The thing is I have no idea how much contamination is in it. Back when
I did the cap conversion in January, all I saw was the copper sulphate
crystals in the float valve - there could be more in the system that I
don't know about. It occurred to me that the first (coarse) screen in the
filter drier isn't needed, as the pellets are removed, which would give
much more room for accumulating the contaminants.
I'll do the repair with the unit charged,
and purge the NCG's as required afterwards. At least this time round I
know any NCG's won't be from leaks and should just be from the nitrogen
separating from the methyl formate.
20th November 2014: The patents
mentioned lard and methyl alcohol. The early patent mentions methyl alcohol
to reduce the formic acid. The next patent was later on when they discovered
the NCG problem. It appears that the lard reduced that, as well as the
formic acid, so it seems the methyl alcohol was no longer required. Although
some vague mention of quantities is given, it might not be exactly was
put in for production.
As blackhorse says, if one was to remove
the old oil, I'd be wanting to put in R11, R123, R601a, etc. as these are
'known' refrigerants that use 'known' oils.
Anyway, I have some interesting news.
I turned on the machine last night, after
it had sat idle since Monday night, and surprisingly everything seemed
normal again. The power consumption started off at 221W and gradually reduced
down to around 180W and eventually down to about 165W. The condenser was
warming nice and evenly. By the sound of boiling in the evaporator, you
certainly wouldn't think there had ever been a blockage. After about 45
mins, it cycled off and all was good again.
Now it's time to start theorising...two
options come to mind. One is that the inlet screen to the modified filter
drier was blocked, and because there's been no circulation for a few days,
the blockage has fallen away from the screen. If this is the situation,
one might expect another blockage soon.
The other option is what Allan suggested;
oil slugging. This is what I initially suspected because when it first
happened I hit the bottom of the evaporator and it did seem to do something
temporarily. There was also 5 1/2 months ice build up on the evaporator
so this may have had some effect. When I restarted the fridge last night,
the room temp (and cabinet temp) was about 25C/77F. So, it was having to
work extra hard to come down to temperature.
I haven't read much about oil slugging
except to know some DR's are prone to it, but I assume that a flooded evaporator
would be more susceptible.
So, what does everyone know about oil
slugging of evaporators? I have to say the run time improved markedly with
an ice free evaporator. I'd just been putting the gradual increase in run
time down to the warm weather, but it's back to its normal 4.5 mins. Perhaps
more frequent defrosting is in order.
24th November 2014: Room temp yesterday
was 33C/91F, so that was an interesting test for both CA's. First time
both have been run in such a hot environment.
I can't recall such a hot temperature
at this time of year - normally it doesn't happen for another couple of
months, and last summer we didn't get any such hot days. Outside it was
37C/99F in the shade.
They coped with it, although of course
the cabinet temperature increased, maybe by about 8F. The "off" times,
particularly for the CA-2 were much reduced. It seemed happier once the
room temp got below 30C.
I forgot to put my bottles of methyl formate
under the house in the cooler air - I'd hate to think what pressure they
must have got up to.
The CA-2 has been running normally since
restarting it five nights ago, so the oil slugged evaporator theory is
still looking good.
Still keeps blocking.
See
forum post here for the following:
11th January 2015: In
this episode of the CA-2 drama series is a repeat of what happened three
months ago, in November 2014. This time I went into the kitchen and found
the 30 min compressor timer had tripped. As the fridge had been working
so well I just thought all the door opening and warm weather had made for
an unusually long run time. I reset it and all good again for the rest
of the day. Then, mid afternoon next day, I noticed a few short cycles.
By evening it was just continuously running with the wattage dropping as
it went into a deep vacuum. Normally, it would be drawing about 165W. It
got down to 144W before I turned it off. Knowing an impromptu defrost was
going to occur, all the contents were moved to the CA-1 for safekeeping.
Hitting the evaporator did give a few
short changes in compressor sound and rises in wattage but only temporarily.
A saucepan of boiling water did likewise.
One interesting thing I noticed was that
with the compressor switched off there was absolute silence from it. Normally
there's a crackling sound from the methyl formate inside the compressor
dome whenever the heater is on. It was like all the methyl formate had
left the compressor and gone somewhere else.
Given the previous time this happened,
I decided to rest it overnight. When restarting this morning, I got some
nice high wattages and rattles as what sounded like the oil slugs broke
free. All seemed promising again. Alas, it's not completely cured. It's
been partially blocking throughout the day, and listening to the refrigerant
flow along the high side tube around the cabinet top it doesn't seem as
lively as normal.
I'm starting to wonder if, assuming the
oil is collecting in the evaporator, I should add more refrigerant. As
it is, it has 80% charge which gives a good frost line with my particular
cap tube. Maybe a higher frost line would get more oil going back into
the compressor. The catch is the cycling times might be worsened.
But then, the CA-1 has a lower frost line
and never has this trouble.
12th January 2015: Thinking more
about the scenario, its behaviour has been exactly like that when the float
valve would block up. The same good and bad days, intermittent power fluctuation,
etc.
At this stage, I'm thinking a blocked
filter is more likely than the oil slugging theory. When I did the capillary
conversion it ran for 10 months with no blockage. And now the second blockage
is only 3 months later. That does make me think the screen is filling up
with crap. The fact it hasn't completely unblocked this time round also
suggests that.
If oil migration to the evap was the cause
of the problem, it seems that it would have been evident a lot sooner.
If anything, the heavy use of the fridge of late should have stirred up
the oil more.
Next thing to do is to order the larger
Supco strainer and install it. It will also give an opportunity to find
out what the contamination level is currently at. The cap tube conversion
was done just on a year ago.
New filter and capillary tube.
23rd February 2015: Following on
from here monitortop.freeforums.net/thread/443/latest-ca-high-side-blockage,
the new Supco S210 strainer arrived so I've installed it, along with a
new 44.5" length of .026" capillary tube.
As before, I charged the unit with nitrogen
to 0psig in order to work on the unit fully charged.
Anyway, silly me forgot to keep the charge
valve open whilst desoldering the old filter drier. So, with a torch waving
about the joint, the pressure built up didn't it!
As it came away there was a good amount
of hissing and the green/yellow flame until it equalised. I guess I lost
a little MF, that which was still in the filter drier anyway.
New Supco S210 strainer and cap tube went
in without any problems, and I spent about 50 minutes purging the nitrogen.
So far all is good, and despite the loss of MF, the frost line is much
the same as before. There should be another minute or two off time, so
I'll probably add a little MF, say .03lb.
Without actually cutting open the old filter
drier, it is completely clean from what I can see inside - like new. The
production of copper sulphate crystals has not occurred since before I
did the initial cap conversion just over a year ago. The corrosion appears
to have stopped. As to what the actual blockage cause was, it's still unknown.
Certain things make me think next time this happens I'll be wanting another
evaporator.
Evaporator Replaced.
See
forum post here for the following:
29th March 2016: Bob had kindly
sent me a CA-2 evap at the end of last year, and with the last blockage
of the original being the last I was prepared to tolerate, it was time
to install the replacement.
First thing was to recover the methyl
formate. I used my car fridge/ice bath set up of previous times:
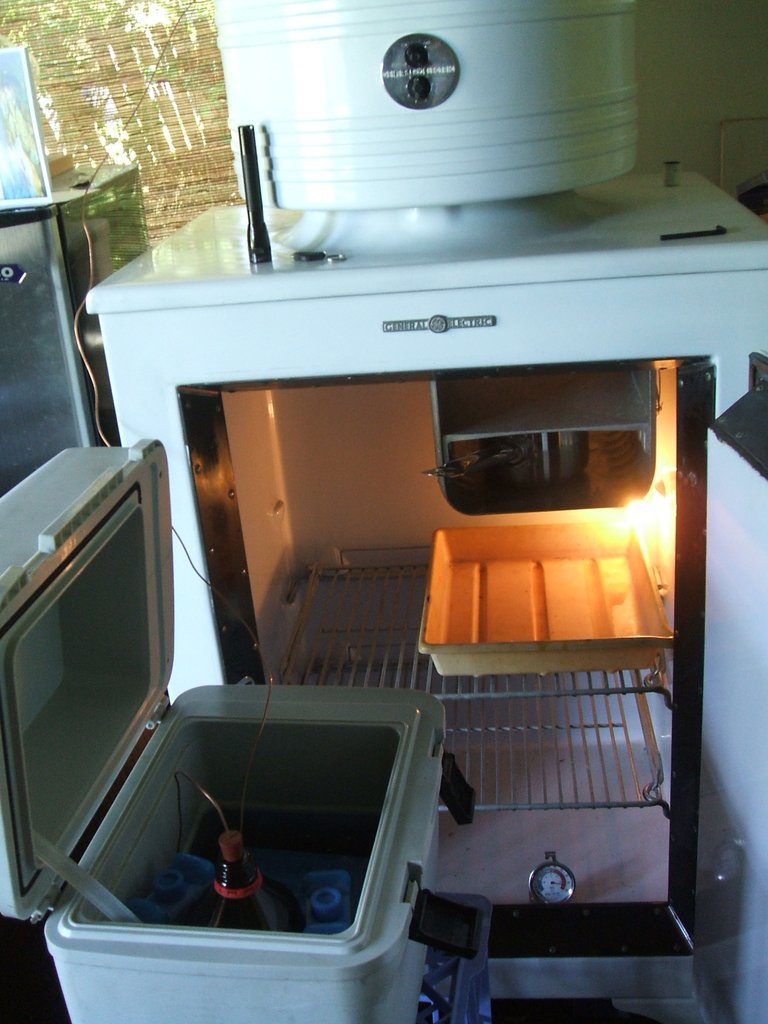
It took about 8 hours to extract all I
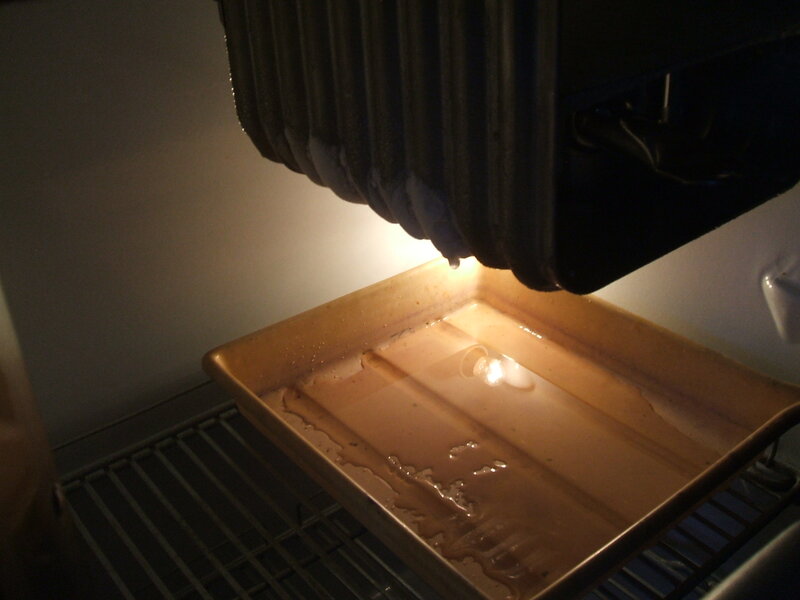
could. About 1.8 lbs was recovered. With my set up it's impossible to recover
it all - the recovery bottle would have to be in a vacuum to do that. The
extractable MF is almost out as shown with the last remaining frost:
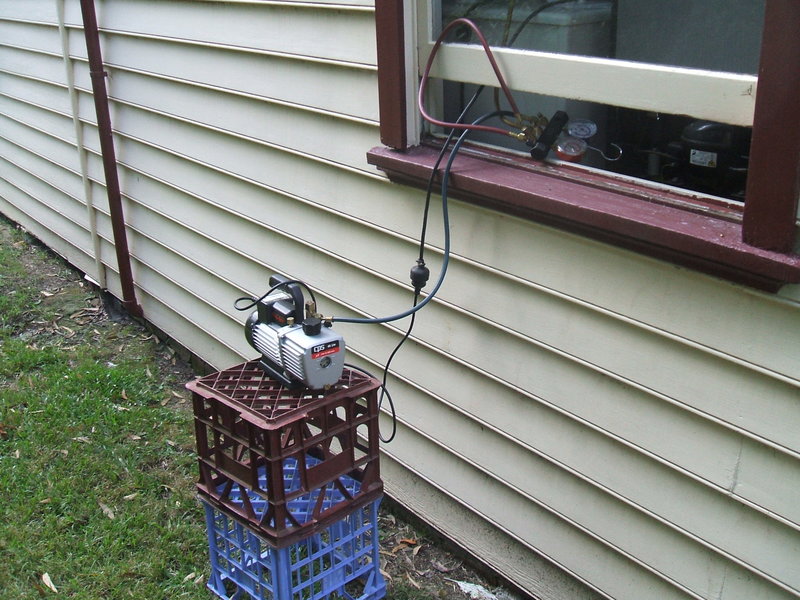
Next is to vacuum out the remainder ready
for a nitrogen refill. I wasn't going to do this job with the machine fully
charged because of the new evaporator having absorbed moisture, and possible
other contaminants - it would have to be cleaned out. Because of .4lbs
of MF remaining, the vacuum pump is placed outside:
Next is to test the new evap for flow.
It was interesting to see how freely the nitrogen flows through an evaporator
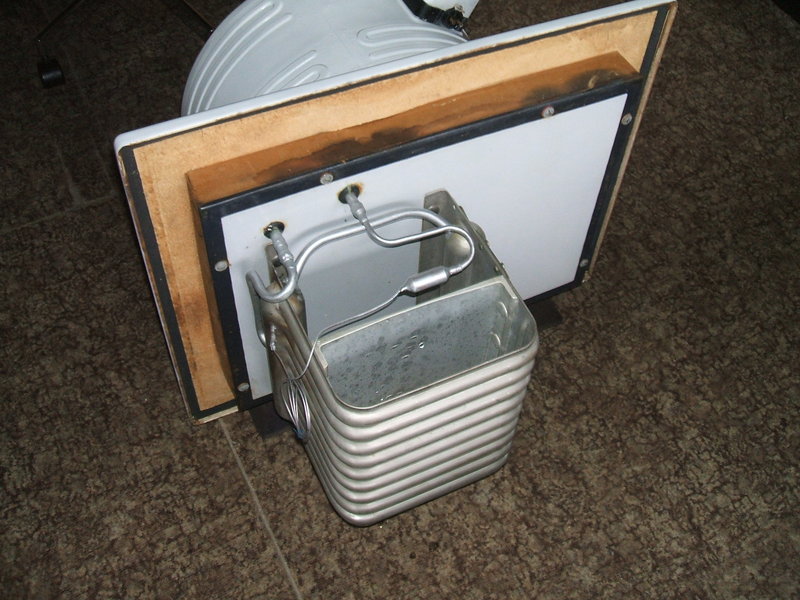
with no blockage. There was absolutely no impediment to flow.

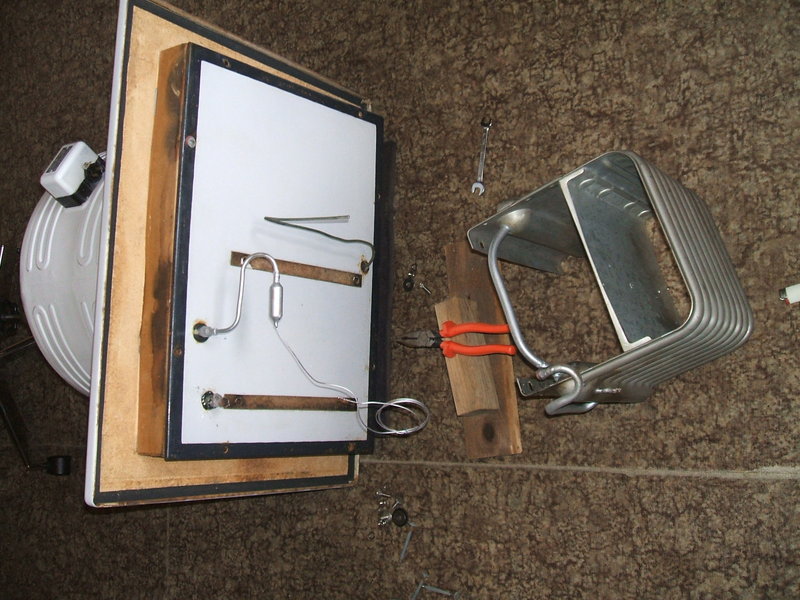
One last look at the original evaporator:
Next is to remove the evaporator. The top
plate screws were removed and then the 1/2" low side tube connection heated.
Once hot enough, the top plate with evap attached could be lifted away,
allowing access to the evap mounting bolts:
The replacement evap was then bolted to
the top plate ready for soldering. I used a spray gel around the low side
grommet to prevent heat damage.
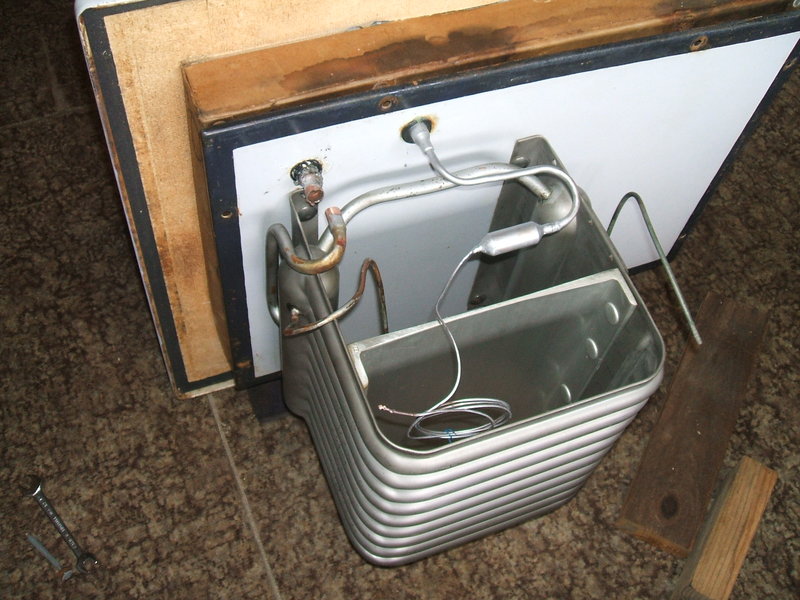
The new evaporator is in!
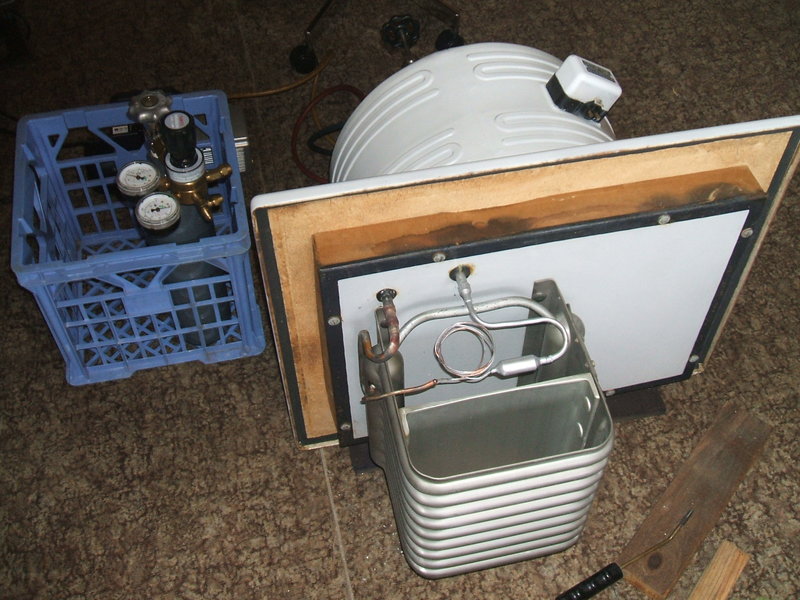
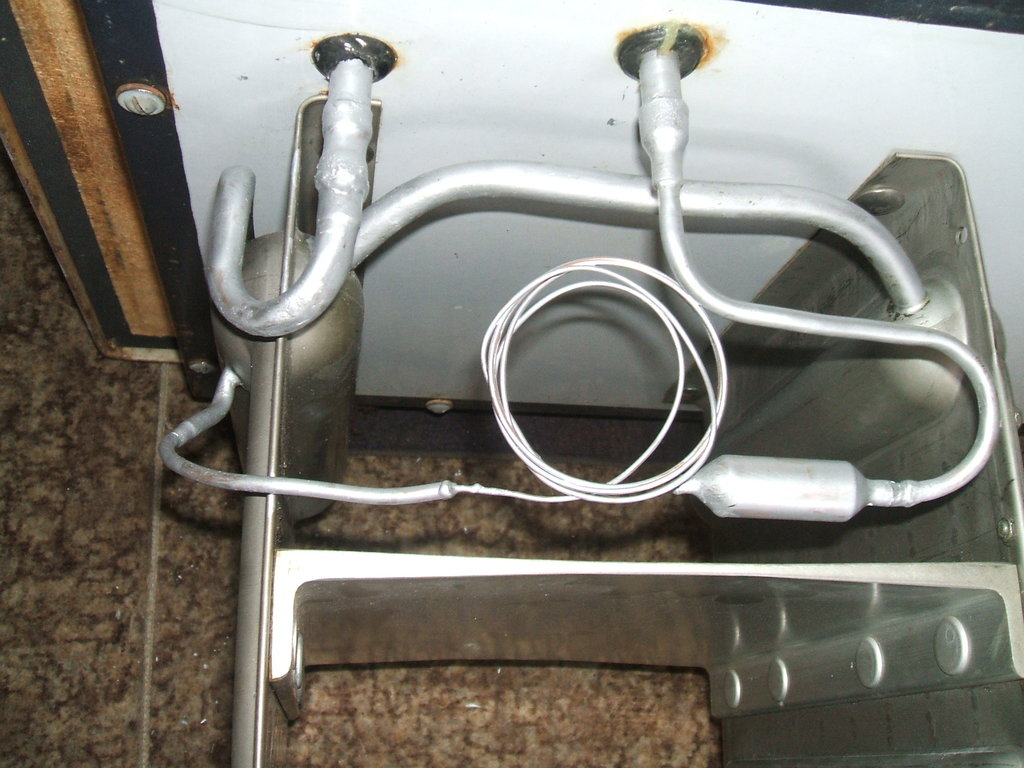
Now to make the copper tubing look pretty:
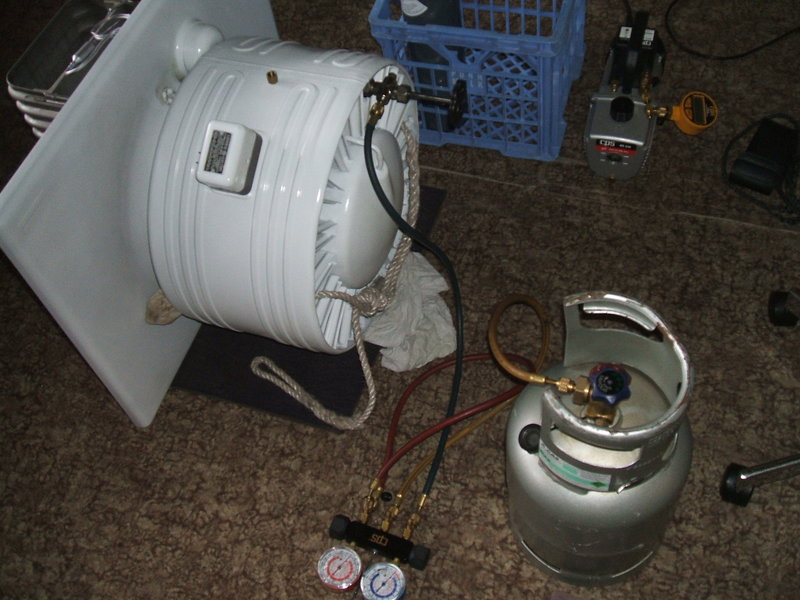
Then to vacuum and fill with R22 at 25psi.
This is to check for leaks at the soldered joins, including the delicate
low side tank connections, and the charge valve. It also helps clean out
the system:
With no leaks detected after three days,
it was time to remove the R22, fill with nitrogen, and vacuum again. Then
to refill. I put in 2.215 lbs of methyl formate to start with:
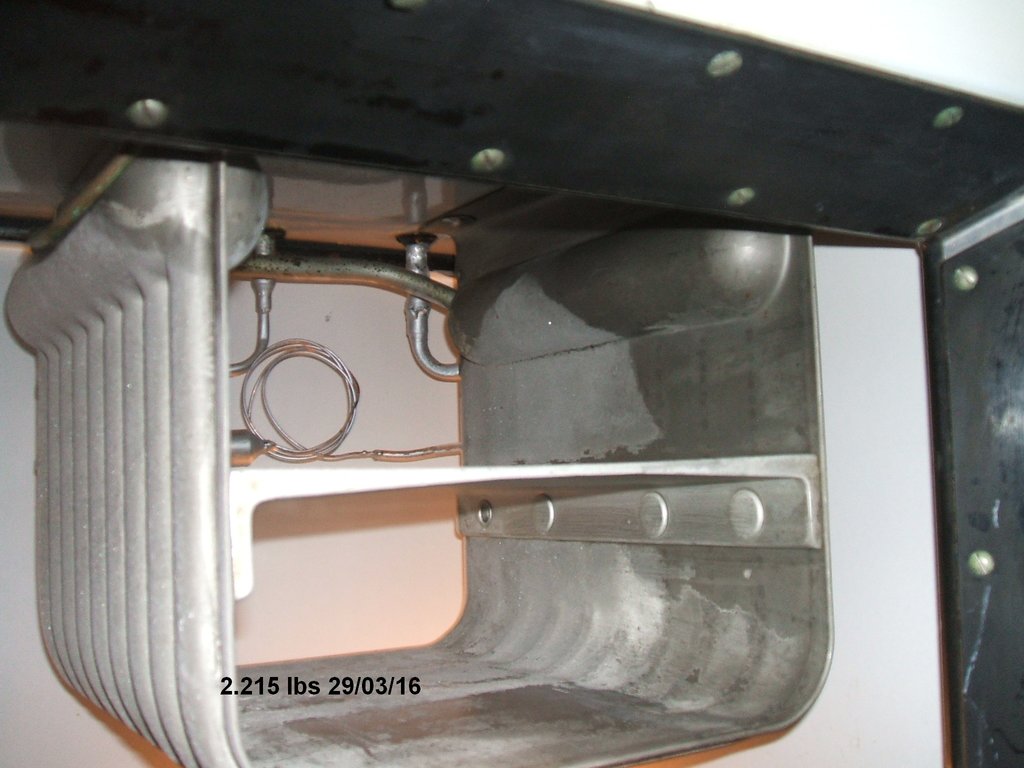
I was quite surprised that with 80% charge,
it was not as frosted as with the original evaporator. But then again,
with a transplant like this, and a properly working evaporator, I shouldn't
be surprised. So, I increased to 2.4 lbs:
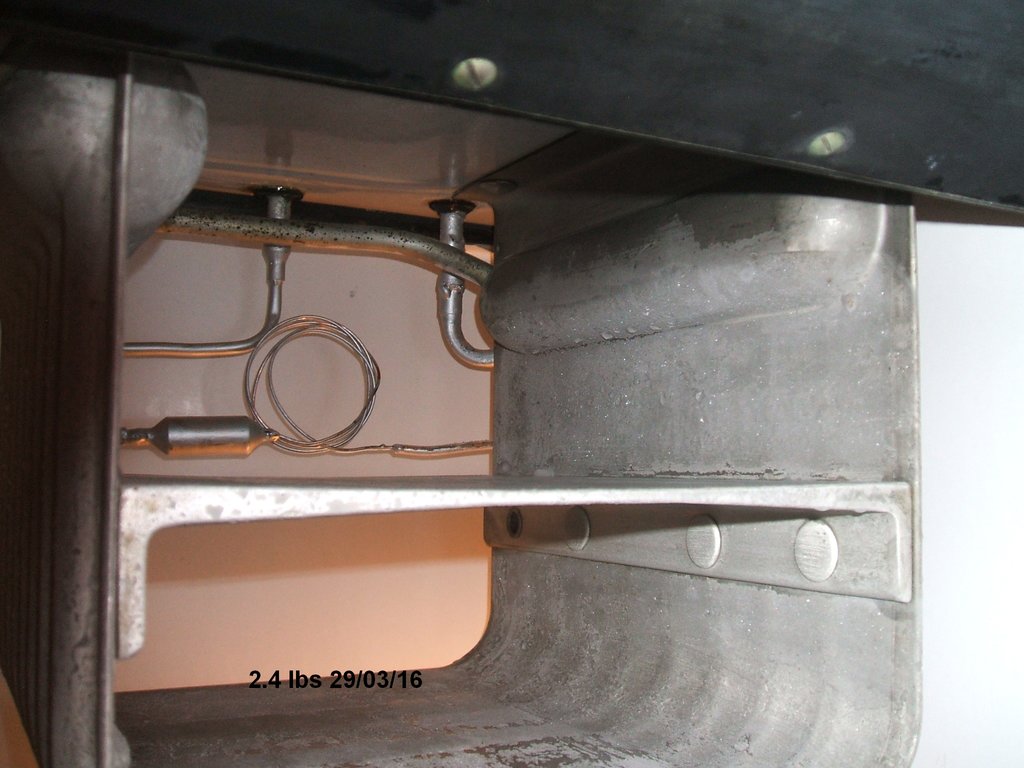
That's closer to what it should be.
The new personality of my CA-2 is different,
and will take a while to get used to. The initial temp pull down was considerably
faster with the new evap, and the thermostat started cycling within about
20 mins, whereas before it might take 40 mins or an hour. The increased
flow of refrigerant was clearly audible - nice loud gurgling sound. No
wonder the cabinet temp was coming down so quickly :)
Overnight, it has stabilised at 31F bottom
of the cabinet temp, and at present the run time is 3.5mins and off time
is 10.5 mins. This would roughly equate to 4.5mins on and 11.5 mins off
which is comparable to what I had before, in the same ambient temp. I'd
like to extend the off time another minute or so, and apart from experimenting
with the MF level, I think the mounting position of the thermostat cap
tube has something to do with it. Looking at my old pics, the thermostat
cap tube end was closer to where the shelf is rivetted to the side of the
evap. The extra thickness here would surely add thermal mass and thus slow
down cycling frequency. So, I'll check that first, and then if necessary
experiment with the charge.
To finish off, I put nitrogen through the
old evap. Even after 3 years of MF flowing through it, the obstruction
is still there. Obviously, the blockage cannot be dissolved by MF which
is what I had hoped. The difference in flow between the two evaps is very
obvious - like night and day.
11th April 2016: It's been running
for just over two weeks now with the new evaporator. I added .095 lbs of
MF at the end of the first week, which brought the frost level up on the
right side side tank to where it should be. There are no unfrosted areas
around the bottom and sides, unlike the original. The appearance of the
frost seems to be different - more fluffy looking rather than looking more
like a frozen sheet of water. Cycling times seem quite good; a bit over
4 mins run and a bit over 10 mins off with an ambient temp of 23C and a
cabinet temp of 30-31F. I could probably improve those very slightly by
removing say .04 lbs, but hardly worth it. Of course I could also back
off the control because it really doesn't need to run that cold. As winter
draws closer here, I'll expect to see off times of at least 15 mins.
Maybe at last, after 4years persistence,
this fridge will now give me the same reliability as the CA-1.
9th May 2016: The replacement evaporator
has been in for just over five weeks, and the system has completely settled
down. Soon after I added the extra charge(it's now 90.7%)there was a slight
rattle, for a few seconds just after it came up to pressure after starting.
My theory is that the extra oil needed to be pushed out of the evaporator.
From what I could hear sloshing around before I installed it, I gather
there was a good quantity already inside. After a few days the rattle went
away and the off times started to improve also. At present, in a 20C (68F)
room, and a bottom of cabinet temperature of 30F, the off times have been
just exceeding 16 mins at times.
9th May 2016: There's been no further
change with the frost pattern. It's all quite even over the frosted areas.
If anything, there is just a very slight dip in the level on the header
tank near where the oil skimmer location is.
10th May 2016: This is the frost
pattern with 2.495 lbs charge:
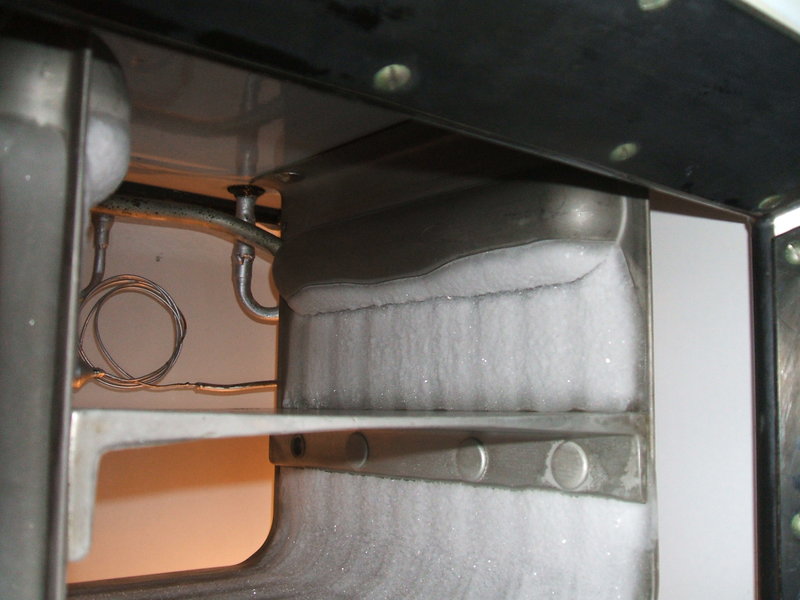
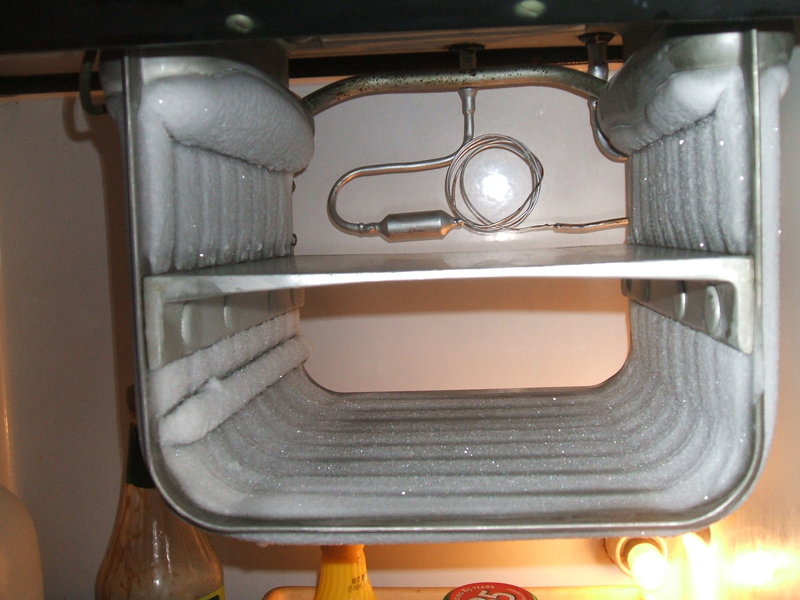
Since the new evaporator was installed,
performance has been completely reliable. This is now my main fridge.
Home


